Building an antenna and receiving ham and shortwave stations with SDR
In my previous blog on the topic of software defined radio (SDR), I provided a quickstart guide to using gqrx, GNU Radio and the RTL-SDR dongle to receive FM radio and the amateur two meter (VHF) band.
Using the same software configuration and the same RTL-SDR dongle, it is possible to add some extra components and receive ham radio and shortwave transmissions from around the world.
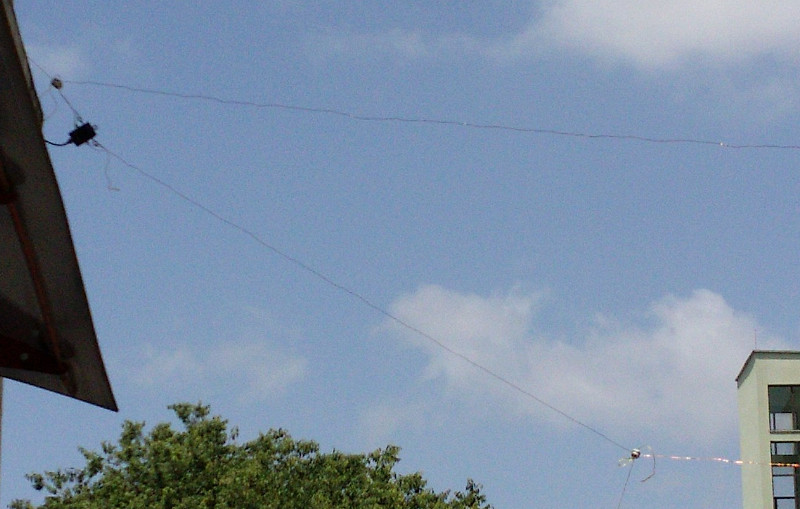
Here is the antenna setup from the successful SDR workshop at OSCAL'17 on 13 May:
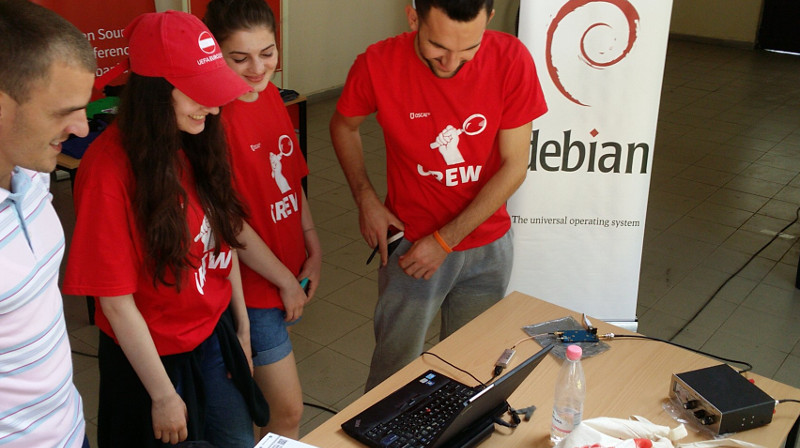
After the workshop on Saturday, members of the OSCAL team successfully reconstructed the SDR and antenna at the Debian info booth on Sunday and a wide range of shortwave and ham signals were detected:
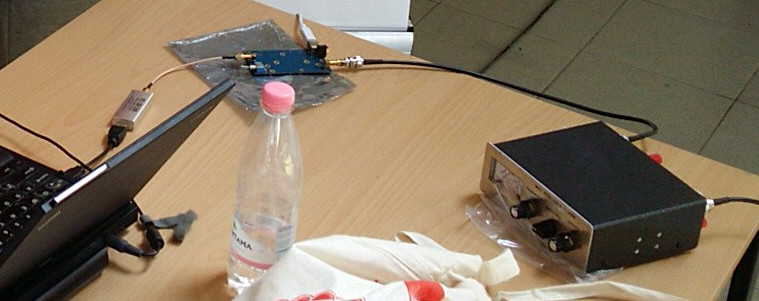
Here is a close-up look at the laptop, RTL-SDR dongle (above laptop), Ham-It-Up converter (above water bottle) and MFJ-971 ATU (on right):
Buying the parts
| Component | Purpose, Notes | Price/link to source |
|---|---|---|
| RTL-SDR dongle | Converts radio signals (RF) into digital signals for reception through the USB port. It is essential to buy the dongles for SDR with TCXO, the generic RTL dongles for TV reception are not stable enough for anything other than TV. | ~ € 25 |
| Enamelled copper wire, 25 meters or more | Loop antenna. Thicker wire provides better reception and is more suitable for transmitting (if you have a license) but it is heavier. The antenna I've demonstrated at recent events uses 1mm thick wire. | ~ € 10 |
| 4 (or more) ceramic egg insulators | Attach the antenna to string or rope. Smaller insulators are better as they are lighter and less expensive. | ~ € 10 |
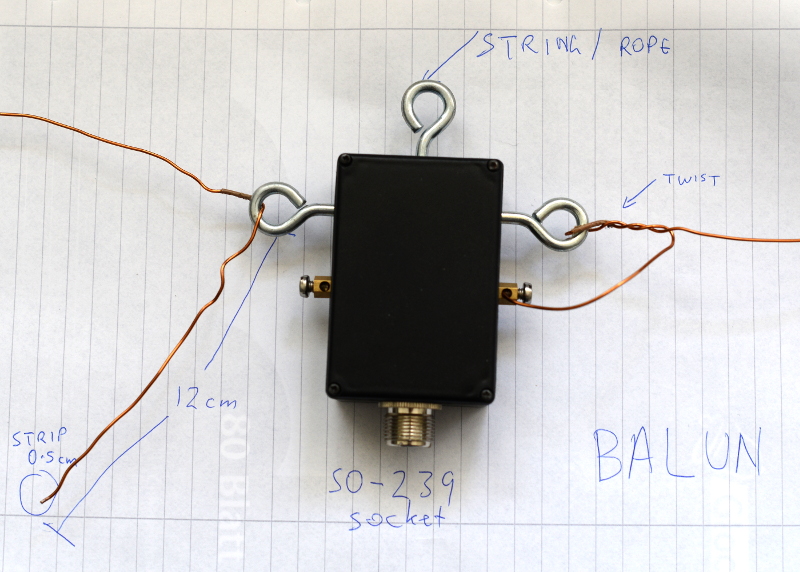
| 4:1 balun | The actual ratio of the balun depends on the shape of the loop (square, rectangle or triangle) and the point where you attach the balun (middle, corner, etc). You may want to buy more than one balun, for example, a 4:1 balun and also a 1:1 balun to try alternative configurations. Make sure it is waterproof, has hooks for attaching a string or rope and an SO-239 socket. | from € 20 |
| 5 meter RG-58 coaxial cable with male PL-259 plugs on both ends | If using more than 5 meters or if you want to use higher frequencies above 30MHz, use thicker, heavier and more expensive cables like RG-213. The cable must be 50 ohm. | ~ € 10 |
| Antenna Tuning Unit (ATU) | I've been using the MFJ-971 for portable use and demos because of the weight. There are even lighter and cheaper alternatives if you only need to receive. | ~ € 20 for receive only or second hand |
| PL-259 to SMA male pigtail, up to 50cm, RG58 | Joins the ATU to the upconverter. Cable must be RG58 or another 50 ohm cable | ~ € 5 |
| Ham It Up v1.3 up-converter | Mixes the HF signal with a signal from a local oscillator to create a new signal in the spectrum covered by the RTL-SDR dongle | ~ € 40 |
| SMA (male) to SMA (male) pigtail | Join the up-converter to the RTL-SDR dongle | ~ € 2 |
| USB charger and USB type B cable | Used for power to the up-converter. A spare USB mobile phone charge plug may be suitable. | ~ € 5 |
| String or rope | For mounting the antenna. A ligher and cheaper string is better for portable use while a stronger and weather-resistent rope is better for a fixed installation. | € 5 |
Building the antenna
There are numerous online calculators for measuring the amount of enamelled copper wire to cut.
For example, for a centre frequency of 14.2 MHz on the 20 meter amateur band, the antenna length is 21.336 meters.
Add an extra 24 cm (extra 12 cm on each end) for folding the wire through the hooks on the balun.
After cutting the wire, feed it through the egg insulators before attaching the wire to the balun.
Measure the extra 12 cm at each end of the wire and wrap some tape around there to make it easy to identify in future. Fold it, insert it into the hook on the balun and twist it around itself. Use between four to six twists.
Strip off approximately 0.5cm of the enamel on each end of the wire with a knife, sandpaper or some other tool.
Insert the exposed ends of the wire into the screw terminals and screw it firmly into place. Avoid turning the screw too tightly or it may break or snap the wire.
Insert string through the egg insulators and/or the middle hook on the balun and use the string to attach it to suitable support structures such as a building, posts or trees. Try to keep it at least two meters from any structure. Maximizing the surface area of the loop improves the performance: a circle is an ideal shape, but a square or 4:3 rectangle will work well too.
For optimal performance, if you imagine the loop is on a two-dimensional plane, the first couple of meters of feedline leaving the antenna should be on the plane too and at a right angle to the edge of the antenna.
Join all the other components together using the coaxial cables.
Configuring gqrx for the up-converter and shortwave signals
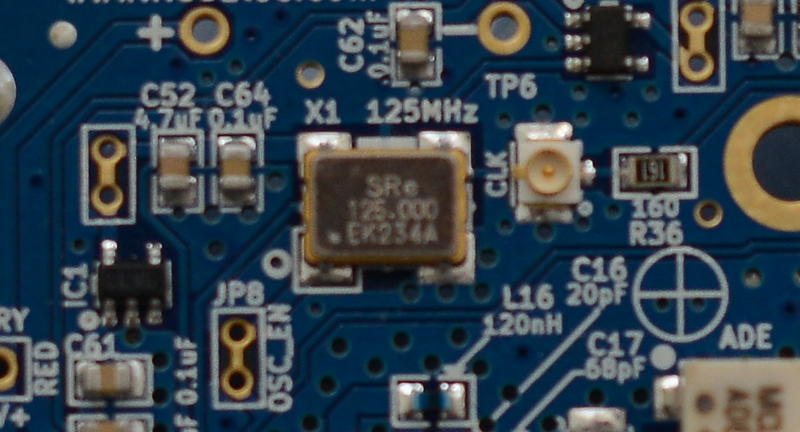
Inspect the up-converter carefully. Look for the crystal and find the frequency written on the side of it. The frequency written on the specification sheet or web site may be wrong so looking at the crystal itself is the best way to be certain. On my Ham It Up, I found a crystal with 125.000 written on it, this is 125 MHz.
Launch gqrx, go to the File menu and select I/O devices. Change the LNB LO value to match the crystal frequency on the up-converter, with a minus sign. For my Ham It Up, I use the LNB LO value -125.000000 MHz.
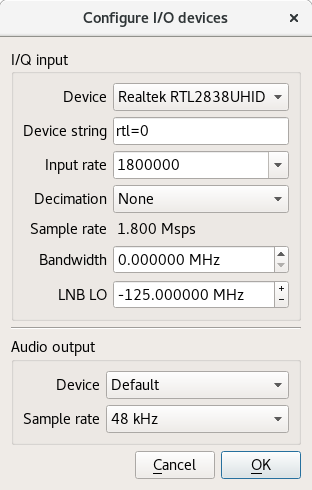
Click OK to close the I/O devices window.
On the Input Controls tab, make sure Hardware AGC is enabled.
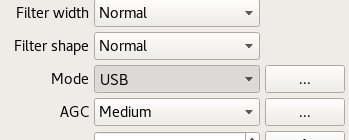
On the Receiver options tab, change the Mode value. Commercial shortwave broadcasts use AM and amateur transmission use single sideband: by convention, LSB is used for signals below 10MHz and USB is used for signals above 10MHz. To start exploring the 20 meter amateur band around 14.2 MHz, for example, use USB.
In the top of the window, enter the frequency, for example, 14.200 000 MHz.
Now choose the FFT Settings tab and adjust the Freq zoom slider. Zoom until the width of the display is about 100 kHZ, for example, from 14.15 on the left to 14.25 on the right.

Click the Play icon at the top left to start receiving. You may hear white noise. If you hear nothing, check the computer's volume controls, move the Gain slider (bottom right) to the maximum position and then lower the Squelch value on the Receiver options tab until you hear the white noise or a transmission.
Adjust the Antenna Tuner knobs
Now that gqrx is running, it is time to adjust the knobs on the antenna tuner (ATU). Reception improves dramatically when it is tuned correctly. Exact instructions depend on the type of ATU you have purchased, here I present instructions for the MFJ-971 that I have been using.
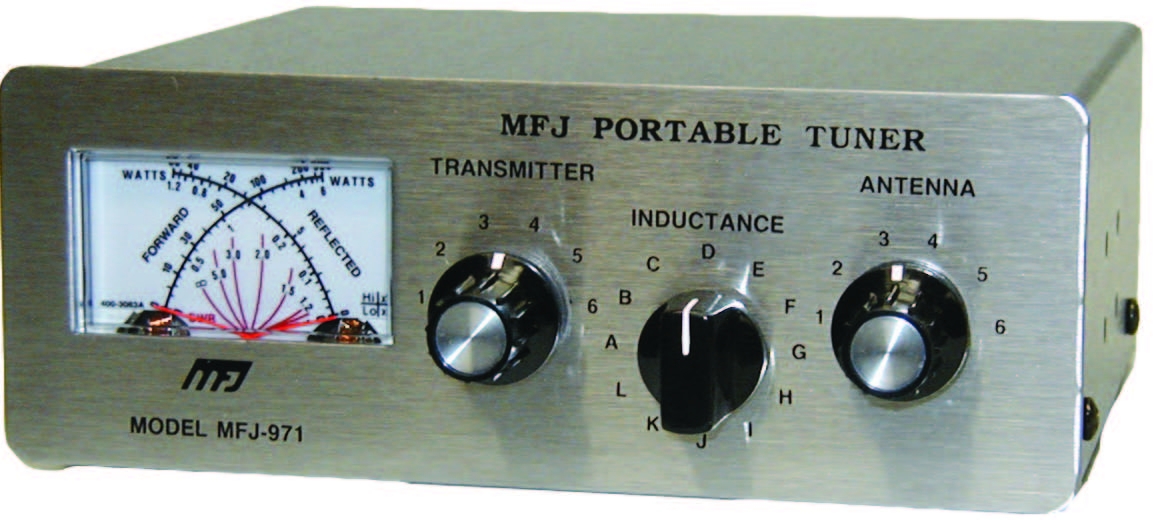
Turn the TRANSMITTER and ANTENNA knobs to the 12 o'clock position and leave them like that. Turn the INDUCTANCE knob while looking at the signals in the gqrx window. When you find the best position, the signal strength displayed on the screen will appear to increase (the animated white line should appear to move upwards and maybe some peaks will appear in the line).
When you feel you have found the best position for the INDUCTANCE knob, leave it in that position and begin turning the ANTENNA knob clockwise looking for any increase in signal strength on the chart. When you feel that is correct, begin turning the TRANSMITTER knob.
Listening to a transmission
At this point, if you are lucky, some transmissions may be visible on the gqrx screen. They will appear as darker colours in the waterfall chart. Try clicking on one of them, the vertical red line will jump to that position. For a USB transmission, try to place the vertical red line at the left hand side of the signal. Try dragging the vertical red line or changing the frequency value at the top of the screen by 100 Hz at a time until the station is tuned as well as possible.
Try and listen to the transmission and identify the station. Commercial shortwave broadcasts will usually identify themselves from time to time. Amateur transmissions will usually include a callsign spoken in the phonetic alphabet. For example, if you hear "CQ, this is Victor Kilo 3 Tango Quebec Romeo" then the station is VK3TQR. You may want to note down the callsign, time, frequency and mode in your log book. You may also find information about the callsign in a search engine.
The video demonstrates reception of a transmission from another country, can you identify the station's callsign and find his location?
If you have questions about this topic, please come and ask on the Debian Hams mailing list. The gqrx package is also available in Fedora and Ubuntu but it is known to crash on startup in Ubuntu 17.04. Users of other distributions may also want to try the Debian Ham Blend bootable ISO live image as a quick and easy way to get started.
Please see more of my blogs about amateur radio.