Using reSIProcate to connect Asterisk with WebRTC
In my previous blog entry about how to get WebRTC going fast I looked at the basics of setting up a SIP proxy (also known as a SIP router) to accept connections from WebRTC clients. As in a traditional, non-WebRTC world, the SIP proxy simply facilitates calling between all the clients it knows. In practice, deployments usually want to add additional functionality in the form of a PBX with queues, voicemail, menus and conferencing.
The recent Asterisk 11 release includes support for WebRTC although it is still evolving and I don't currently recomend connecting Asterisk directly to the public Internet. In particular, Asterisk doesn't support features like mutual TLS authentication with the WSS (secure WebSocket) transport. Here, we look at how repro can accept connections from Internet/web users and relay them to an internal Asterisk server. Here is an architecture diagram:
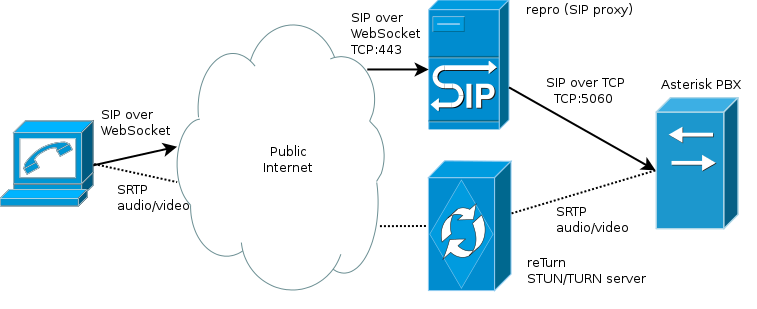
Notice that the SIP messages are accepted over repro's WebSocket transport and relayed to Asterisk over a regular SIP TCP transport. This means that we benefit from repro's TLS support too, so the WebSocket client has a much higher chance of escaping their client-side firewall if port 443 is used (repro pretending to be a HTTPS server) and clients can be authenticated with certificates in their browser.
Here are the steps to get it running:
repro and reTurn setup
Set up repro and reTurn server on a Debian server as per my previous blog post. Verify that the clients can talk to repro.
Asterisk source build
Digium, the creators of Asterisk, are not currently supporting Debian packages, but they do provide RPM packages in their Asterisk package repository
However, the pre-built binary packages for Asterisk 11.4 don't include SRTP support. SRTP is a mandatory part of WebRTC. Therefore, we take the Source RPM (SRPM) and build it manually.
First, it is recommended that you start with a completely fresh CentOS 6 or RHEL6 server. I built a fresh virtual machine in my XCP environment using a procedure similar to that documented by Grant. After installing and setting a root password, configure yum to access EPEL6
Make sure SELinux and firewall are disabled on the box (they are often enabled by default). A quick way to do this:
# sed -i s/SELINUX=enforcing/SELINUX=disabled/g /etc/selinux/config
# reboot
...

# iptables -I INPUT -j ACCEPT
Next you can tell yum about the Digium repository and install all the necessary dependencies for building Asterisk:
# rpm -Uvh http://packages.asterisk.org/centos/6/current/x86_64/RPMS/asterisknow-version-3.0.0-1_centos6.noarch.rpm
# yum update
# yum install rpm-build libsrtp-devel
In your home directory, set up a work tree for rpmbuild:
$ mkdir ~/rpmbuild
$ cd ~/rpmbuild
$ mkdir BUILD BUILDROOT RPMS SOURCES SPECS SRPMS
$ cd SPECS
$ wget http://danielpocock.com/sites/danielpocock.com/files/asterisk.spec
$ cd ../SRPMS
$ wget http://packages.asterisk.org/centos/6/asterisk-11/SRPMS/asterisk-11.4.0-1_centos6.src.rpm
$ rpmbuild --rebuild asterisk-11.4.0-1_centos6.src.rpm
At this stage, you will have some errors, but it has successfully extracted the tarball into the SOURCES directory:
$ ls -l ../SOURCES
-rw-r--r--   1 daniel daniel 11573400 May 20 23:07 asterisk-sources-11.4.0.tar.gz
$
It will also complain about missing dependencies, you install them using yum:
# yum install make gcc gcc-c++ ....
Notice that you have downloaded a slightly modified version of the asterisk.spec file, the reasons for this are explained in this mailing list discussion. The following should now trigger a successful build:
$ rpmbuild -bb \
  --without tds \
    --without misdn \
    --without odbc \
   ~/rpmbuild/SOURCES/asterisk.spec
Hopefully, Digium will add the SRTP support in the 11.4.1 packages so that source build won't be necessary for every future release.
Asterisk configuration: demo application
Here we just have to install the RPMs and make a quick configuration change:
$ cd ~/rpmbuild/RPMS/x86_64
$ su -
# rpm -i asterisk*rpm
# yum install asterisk-sounds-core-en-ulaw asterisk-sounds-extra-en-ulaw --enablerepo=asterisk-11
# ln -s /usr/share/asterisk/sounds/demo-* /var/lib/asterisk/sounds/en/
To enable connections from the proxy, we must set a few non-default settings. It is essential to use the TCP transport as the SIP messages from WebSocket clients are usually too big for UDP packets. It is also necessary to enable SRTP and AVPF, as these are mandatory in WebRTC. Here is a diff against the default /etc/asterisk/sip.conf:
--- /etc/asterisk.orig/sip.conf	2013-06-04 10:57:49.428617785 +0200
+++ /etc/asterisk/sip.conf	2013-06-04 11:18:17.825604261 +0200
@@ -207,7 +207,7 @@
 ; subject to change in any release.  If they are changed, the changes will
 ; be reflected in this sample configuration file, as well as in the UPGRADE.txt file.
 ;
-tcpenable=no                    ; Enable server for incoming TCP connections (default is no)
+tcpenable=yes                    ; Enable server for incoming TCP connections (default is no)
 tcpbindaddr=0.0.0.0             ; IP address for TCP server to bind to (0.0.0.0 binds to all interfaces)
                                 ; Optionally add a port number, 192.168.1.1:5062 (default is port 5060)

@@ -1371,6 +1371,13 @@
 ; ...
 ;

+[1001](public-phone,ulaw-phone)
+avpf = yes
+encryption = yes
+context = public
+icesupport = yes
+
+
 ; Standard configurations not using templates look like this:
 ;
 ;[grandstream1]
This assumes that the SIP user ID of your WebSocket user is 1001
Now you can start Asterisk:
# service asterisk start
Configuring the repro SIP proxy to send calls to Asterisk
This is a relatively simple demonstration. The goal is to send calls for the number 1000 to the demo application in Asterisk
In repro's web interface, click ADD ROUTE in the menu. Use the following parameters and leave all other options blank:
- URI: ^sip:([0-9]+)@
- Destination: sip:$1@pbx.example.org?transport=tcp
Note: replace pbx.example.org with the hostname or IP address of the box running Asterisk
Go to the ADD USER menu link and add a user called 1001. The user ID and password have to be placed in the custom.js file for JsSIP
Testing from JsSIP
I assume JsSIP was set up following the instructions from my previous blog post
Asterisk doesn't support the video codec from a WebRTC client. To work around this, in the custom.js file for JsSIP, make sure video is disabled by default.
In the WebRTC client, dial 1000. You should hear the demo greeting from Asterisk.
Troubleshooting
- Check the JavaScript log in the browser
- Check the logs on the repro proxy and increase the verbosity of the logs if necessary. If the level is set to STACK, you will see full copies of each SIP message sent and received.
- Connect to the Asterisk console (UNIX command: asterisk -r -vvv) and enable SIP message display: sip set debug on.